共计 19259 个字符,预计需要花费 49 分钟才能阅读完成。
背景
ELK 是业内流行的日志组件,公司内也一直在使用。
近日来我的站点访问量慢慢增长,于是萌生了分析日志的念头。
由于个人环境日志量小且硬件资源有限,在一番比较后选择了更为轻量的 Grafana Loki 。
为什么选择 Loki
优点:
- 轻量级: Loki 专注于提供一种更轻量级的日志聚合解决方案,它的存储需求通常比 ELK 栈要少。
- 成本效益: 由于其存储方式,Loki 可能在存储成本上更有优势,特别是在大规模部署时。
- 与 Grafana 集成: Loki 是为了与 Grafana 紧密集成而设计的,这意味着如果你已经在使用 Grafana,那么添加 Loki 作为日志管理工具会非常方便。
- 简化的数据模型: Loki 使用一个简单的数据模型,它索引日志流的元数据而不是内容,这使得其性能更高,操作也更简单。
缺点:
- 搜索能力: 由于 Loki 不索引日志内容,其搜索能力不如 ELK 强大,对于复杂的文本搜索和分析可能不够用。
- 成熟度: Loki 相对于 ELK 来说是较新的项目,可能在特性支持和社区成熟度方面不如 ELK。
- 数据聚合: Loki 在数据转换和聚合方面的功能比 ELK 有限,可能需要额外的工具或服务来补充。
对比ELK,在个人环境中 Loki 的 轻量特性 优势巨大,而且研究 Loki 这种前沿竞品,对个人技能提升而言提升更明显。
前置准备
要分析 nginx 请求,首先需要按期望的格式保存 nginx 日志。除了常规字段外,我还期望对用户的地理位置进行分析。
Nginx GeoIP2
源码编译 Nginx
nginx 可以引用 GeoIP 或 GeoIP2 ,根据请求中 remote_addr 或 http_x_forwarded_for 等值为 IP 的变量查询数据库。
GeoIP 使用 .dat 格式的数据库,而 GeoIP2 使用 .mmdb 数据库。
两者我都实践了下,最终选择了 GeoIP2。
原因是 GeoIP2 方式提供的数据库更 新,IP 解析的位置更为准确。而 GeoIP 只能在互联网上获取一些老旧的数据库,位置解析不够准确。
操作系统:Ubuntu20.04
需要先源码编译,安装对应的模块。
对于 GeoIP ,需要额外添加编译参数 --with-http_geoip_module。
# 下载源码包
mkdir /usr/local/nginx && cd /usr/local/nginx
wget https://github.com/leev/ngx_http_geoip2_module/archive/refs/tags/3.4.tar.gz
tar xf 3.4.tar.gz

# 查看 旧nginx编译参数,增加 --with-http_geoip_module
nginx -V

# 安装编译环境所需的依赖
apt install openssl libssl-dev libpcre3 libpcre3-dev zlib1g-dev make libgeoip-dev

# 编译安装
./configure --prefix=/usr/local/nginx --with-pcre-jit --with-stream --with-stream_ssl_module --with-stream_ssl_preread_module --with-http_v2_module --without-mail_pop3_module --without-mail_imap_module --without-mail_smtp_module --with-http_stub_status_module --with-http_realip_module --with-http_addition_module --with-http_auth_request_module --with-http_secure_link_module --with-http_random_index_module --with-http_gzip_static_module --with-http_sub_module --with-http_dav_module --with-http_flv_module --with-http_mp4_module --with-http_gunzip_module --with-threads --with-stream --with-http_ssl_module --with-http_geoip_module
make -j 2
make install

# 确认重新编译后的参数
/usr/local/sbin/nginx -V

# 重载 systemd
systemctl daemon-reload
systemctl restart nginx
对于 GeoIP2,需要额外引入 --add-module=./ngx_http_geoip2_module-3.4,这个模块并不在源码包中,需要单独下载。
参考链接:CSDN Nginx GeoIP2 配置
# 下载源码包
mkdir /usr/local/nginx && cd /usr/local/nginx
wget https://nginx.org/download/nginx-1.24.0.tar.gz
tar xf nginx-1.24.0.tar.gz
cd nginx-1.24.0

# 查看并记录旧nginx编译参数
nginx -V

# Ubuntu 20.04 安装编译环境所需的依赖
apt install openssl libssl-dev libpcre3 libpcre3-dev zlib1g-dev make libgeoip-dev

# CentOS 7 安装编译环境所需的依赖
# yum -y install zlib zlib-devel openssl openssl-devel pcre pcre-devel gcc gcc-c++ autoconf automake make psmisc net-tools lsof vim geoip geoip-devel libxml2-devel libxslt-devel gd-devel perl-ExtUtils-Embed gperftools-devel

# 编译安装 libmaxminddb 依赖
wget -c https://github.com/maxmind/libmaxminddb/releases/download/1.6.0/libmaxminddb-1.6.0.tar.gz
tar -zxvf libmaxminddb-1.6.0.tar.gz
cd libmaxminddb-1.6.0
./configure
make && make install

# 下载 ngx_http_geoip2_module-3.4
wget http://nginx.org/download/nginx-1.22.0.tar.gz
tar xf nginx-1.22.0.tar.gz

# 编译安装nginx,在旧的基础上增加 --add-module=./ngx_http_geoip2_module-3.4
./configure --prefix=/usr/local/nginx --with-pcre-jit --with-stream --with-stream_ssl_module --with-stream_ssl_preread_module --with-http_v2_module --without-mail_pop3_module --without-mail_imap_module --without-mail_smtp_module --with-http_stub_status_module --with-http_realip_module --with-http_addition_module --with-http_auth_request_module --with-http_secure_link_module --with-http_random_index_module --with-http_gzip_static_module --with-http_sub_module --with-http_dav_module --with-http_flv_module --with-http_mp4_module --with-http_gunzip_module --with-threads --with-stream --with-http_ssl_module --add-module=./ngx_http_geoip2_module-3.4
make -j 2
make install

# 确认重新编译后的参数
/usr/local/sbin/nginx -V

# 重载 systemd
systemctl daemon-reload
systemctl restart nginx
下载 GeoIP2 数据库
参考链接:CSDN GeoIP2 数据库选择
实践时我尝试了三个不同的数据库:
- GeoIP2:maxmind
- GeoIP2:dbip
- GeoIP:mailfud.org/geoip-legacy…
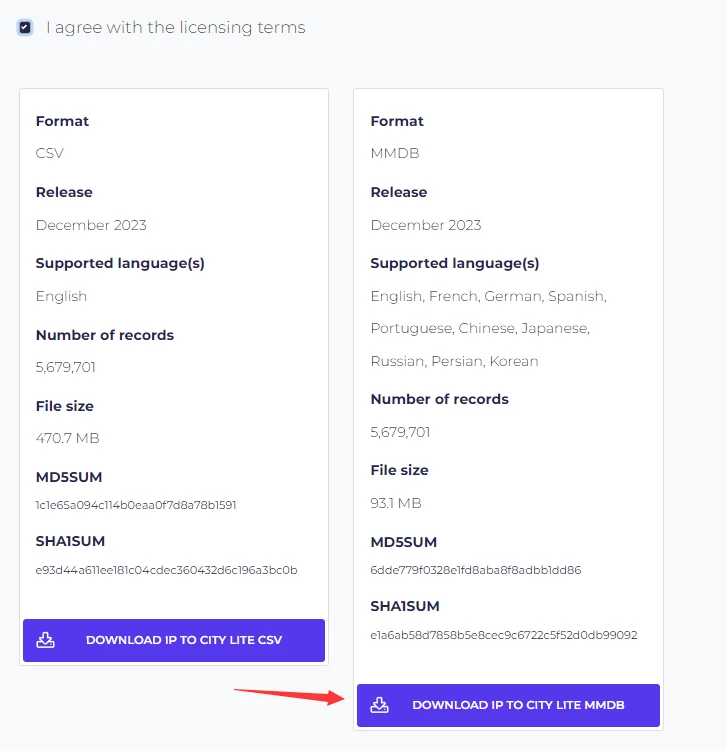
站点主要用户群在国内,我期望精度可以精确到城市,测试下来对于中国城市,dbip 的数据最精准。
lite版本的数据库是免费的:dbip Geoip2 mmdb 下载地址。
# 创建数据库存储目录
mkdir /usr/share/GeoIP/ && cd /usr/share/GeoIP/

# 下载并解压
wget https://download.db-ip.com/free/dbip-city-lite-2023-12.mmdb.gz
gzip -dc dbip-city-lite-2023-12.mmdb.gz > dbip-city-lite-2023-12.mmdb

# 测试 编译安装的 libmaxminddb 和数据库准确性
# mmdblookup  --file /usr/share/GeoIP/dbip-city-lite-2023-12.mmdb --ip 111.183.64.239

  {
    "city":
      {
        "names":
          {
            "en":
              "Wulipu" <utf8_string>
          }
      }
    "continent":
      {
        "code":
          "AS" <utf8_string>
        "geoname_id":
          6255147 <uint32>
        "names":
          {
            "de":
              "Asien" <utf8_string>
            "en":
              "Asia" <utf8_string>
            "es":
              "Asia" <utf8_string>
            "fa":
              " آسیا" <utf8_string>
            "fr":
              "Asie" <utf8_string>
            "ja":
              "アジア大陸" <utf8_string>
            "ko":
              "아시아" <utf8_string>
            "pt-BR":
              "Ásia" <utf8_string>
            "ru":
              "Азия" <utf8_string>
            "zh-CN":
              "亚洲" <utf8_string>
          }
      }
    "country":
      {
        "geoname_id":
          1814991 <uint32>
        "is_in_european_union":
          false <boolean>
        "iso_code":
          "CN" <utf8_string>
        "names":
          {
            "de":
              "China, Volksrepublik" <utf8_string>
            "en":
              "China" <utf8_string>
            "es":
              "China" <utf8_string>
            "fa":
              "چین" <utf8_string>
            "fr":
              "Chine" <utf8_string>
            "ja":
              "中国" <utf8_string>
            "ko":
              "중국" <utf8_string>
            "pt-BR":
              "China" <utf8_string>
            "ru":
              "Китай" <utf8_string>
            "zh-CN":
              "中国" <utf8_string>
          }
      }
    "location":
      {
        "latitude":
          30.737800 <double>
        "longitude":
          112.238000 <double>
      }
    "subdivisions":
      [
        {
          "names":
            {
              "en":
                "Hubei" <utf8_string>
            }
        }
      ]
  }
Nginx 保留客户端真实IP
# cat /etc/nginx.conf
...
    proxy_set_header    Host  $host;
    proxy_set_header    X-Real-IP  $remote_addr;
    proxy_set_header X-Forwarded-For $proxy_add_x_forwarded_for;
    proxy_set_header X-Forwarded-Proto $scheme;

...

# 重载nginx
nginx -t
nginx -s reload
Nginx 引用 mmdb
首先需要安装 geoip 相关的依赖:
# CentOS 7
yum install geoip-devel

# Ubuntu 20.04
apt install libgeoip-dev
这里遇到一个问题。
在站点未使用 cdn 时,客户端 IP 会存储在 nginx 请求的 $remote_addr 中。
在站点使用了 cdn 时,客户端 IP 会存储在 nginx 请求的 $http_x_forwarded_for 中。
绝大部分站点没有使用cdn,少量站点使用了cdn。对于这两种情况,需要分别进行处理。
将默认配置设置为从 $remote_addr 中分析 IP 位置,对于使用了 cdn 的域名,单独在子配置文件中的 server 块改写 geoip2 变量。
示例如下:
nginx 主配置文件:/etc/nginx/conf/nginx.conf
同时添加多个变量配置,分别从 $remote_addr 和 $http_x_forwarded_for获取 IP :
# 以下配置在 http 块中
# cat /etc/nginx/conf/nginx.conf
...
    # geoip2多个变量需要增加size
    variables_hash_max_size 2048;
    variables_hash_bucket_size 128;

    # 加载geoip2 mmdb数据库
    geoip2 /usr/share/GeoIP/dbip-city-lite-2023-12.mmdb {
        auto_reload 5m;
        # 默认配置
        $geoip2_data_country_code source=$remote_addr country iso_code;
        $geoip2_data_country_name source=$remote_addr country names en;

        $geoip2_data_city_name source=$remote_addr city names en;
        $geoip2_metadata_db_subdivisions_0_name  source=$remote_addr subdivisions 0 names en;

        # cdn 配置
        $geoip2_data_country_code_forwarded source=$http_x_forwarded_for country iso_code;
        $geoip2_data_country_name_forwarded source=$http_x_forwarded_for country names en;

        $geoip2_data_city_name_forwarded source=$http_x_forwarded_for city names en;
        $geoip2_metadata_db_subdivisions_0_name_forwarded source=$http_x_forwarded_for subdivisions 0 names en;
    }

...
nginx 子配置文件:/etc/nginx/conf/conf.d/cdn-opshub.cn.conf
在指定的 server 中,配置将 $geoip2_data<span style="font-weight: bold;" data-type="strong">* 改写为 $geoip2_data</span>*_forwarded。
# 以下配置在 server 块中,将
# cat /etc/nginx/conf/conf.d/cdn-opshub.cn.conf
...
  set $geoip2_data_country_code $geoip2_data_country_code_forwarded;
  set $geoip2_data_country_name $geoip2_data_country_name_forwarded;
  set $geoip2_data_city_name $geoip2_data_city_name_forwarded;
  set $geoip2_metadata_db_subdivisions_0_name $geoip2_metadata_db_subdivisions_0_name_forwarded;
...
Nginx 日志格式
参考链接:grafana.com/grafana/dash…
按照 grafana dashborad loki 的推荐配置做了更改,精简了部分字段。
同时,因为上文所说的 cdn 站点,为了方便后续在 grafana 面板配置针对 loki 的查询语句,同时配置不同的日志记录格式。
将默认配置设置为从 $remote_addr 中保存用户 IP,对于使用了 cdn 的域名,单独在子配置文件中的 server 块改写 remote_addr 变量的值为 http_x_forwarded_for。
# 以下配置在 http 块中
# cat /etc/nginx/nginx.conf
...
    # 默认日志格式配置
    log_format json_analytics_default escape=json '{'
                    '"remote_addr": "$remote_addr", ' # client IP
                    '"time_local": "$time_local", '
                    '"time_iso8601": "$time_iso8601", ' # local time in the ISO 8601 standard format
                    '"request": "$request", ' # full path no arguments if the request
                    '"request_uri": "$request_uri", ' # full path and arguments if the request
                    '"request_time": "$request_time", ' # request processing time in seconds with msec resolution
                    '"status": "$status", ' # response status code
                    '"http_referer": "$http_referer", ' # HTTP referer
                    '"http_user_agent": "$http_user_agent", ' # user agent
                    '"http_x_forwarded_for": "$http_x_forwarded_for", ' # http_x_forwarded_for
                    '"http_host": "$http_host", ' # the request Host: header
                    '"ssl_protocol": "$ssl_protocol", ' # TLS protocol
                    '"scheme": "$scheme", ' # http or https
                    '"request_method": "$request_method", ' # request method
                    '"server_protocol": "$server_protocol", ' # request protocol, like HTTP/1.1 or HTTP/2.0
                    '"geoip_country_code": "$geoip2_data_country_code",'
                    '"geoip_country_name": "$geoip2_data_country_name",'
                    '"geoip_city_name": "$geoip2_data_city_name",'
                    '"geoip_city_subdivisions_name": "$geoip2_metadata_db_subdivisions_0_name"'
                    '}';

    access_log /data/logs/nginx/json_access.log json_analytics_default;
...

# 以下配置在 http 块中
# cat /etc/nginx/conf/conf.d/cdn-opshub.cn.conf
...
log_format json_analytics_cdn escape=json '{'
                '"remote_addr": "$http_x_forwarded_for", ' # client IP
                '"time_local": "$time_local", '
                '"time_iso8601": "$time_iso8601", ' # local time in the ISO 8601 standard format
                '"request": "$request", ' # full path no arguments if the request
                '"request_uri": "$request_uri", ' # full path and arguments if the request
                '"request_time": "$request_time", ' # request processing time in seconds with msec resolution
                '"status": "$status", ' # response status code
                '"http_referer": "$http_referer", ' # HTTP referer
                '"http_user_agent": "$http_user_agent", ' # user agent
                '"http_x_forwarded_for": "$http_x_forwarded_for", ' # http_x_forwarded_for
                '"http_host": "$http_host", ' # the request Host: header
                '"ssl_protocol": "$ssl_protocol", ' # TLS protocol
                '"scheme": "$scheme", ' # http or https
                '"request_method": "$request_method", ' # request method
                '"server_protocol": "$server_protocol", ' # request protocol, like HTTP/1.1 or HTTP/2.0
                '"geoip_country_code": "$geoip2_data_country_code",'
                '"geoip_country_name": "$geoip2_data_country_name",'
                '"geoip_city_name": "$geoip2_data_city_name",'
                '"geoip_city_subdivisions_name": "$geoip2_metadata_db_subdivisions_0_name"'
                '}';
...

# 以下配置在 server 块中
# cat /etc/nginx/conf/conf.d/cdn-opshub.cn.conf
...
    access_log /data/logs/nginx/json_access.log json_analytics_cdn;
...


# 查看当前日志
# systemctl reload nginx
# cat /data/logs/nginx/json_access.log |grep "111.183.64.239" |tail -n 1
{"remote_addr": "111.183.64.239", "time_local": "14/Dec/2023:19:06:11 +0800", "time_iso8601": "2023-12-14T19:06:11+08:00", "request": "GET /video/:/transcode/universal/session/c6me3jdv2ise36v9q0ppfnvc/0/735.m4s HTTP/2.0", "request_uri": "/video/:/transcode/universal/session/c6me3jdv2ise36v9q0ppfnvc/0/735.m4s", "request_time": "6.794", "status": "200", "http_referer": "https://plex.opshub.cn/web/index.html", "http_user_agent": "Mozilla/5.0 (Linux; Android 11; SM-G9810 Build/RP1A.200720.012) AppleWebKit/537.36 (KHTML, like Gecko)  Chrome/99.0.4844.88 Mobile Safari/537.36", "http_x_forwarded_for": "", "http_host": "plex.opshub.cn", "ssl_protocol": "TLSv1.2", "scheme": "https", "request_method": "GET", "server_protocol": "HTTP/2.0", "geoip_country_code": "CN","geoip_country_name": "China","geoip_city_name": "Wulipu","geoip_city_subdivisions_name": "Hubei"}
日志为json格式,并且记录了配置好的字段。
Grafana Loki
参考链接:loki docker部署 官方文档
简单介绍下架构:
- loki:主服务,负责存储日志和处理查询。
-
promtail:代理,负责收集日志并将其发送给 loki 。
-
Grafana:用于查询和绘制面板。
已经有现成的 Grafana,所以不再单独安装。
Loki
mkdir /usr/local/loki && cd /usr/local/loki

wget https://raw.githubusercontent.com/grafana/loki/v2.9.1/cmd/loki/loki-local-config.yaml -O loki-config.yaml

# 修改配置,用于解决 grafana 报错 `too many outstanding requests`
# vim loki-config.yaml
limits_config:
  split_queries_by_interval: 0

# 启动
docker run --name loki -d -v $(pwd):/mnt/config -p 3100:3100 grafana/loki:2.9.1 -config.file=/mnt/config/loki-config.yaml

# docker ps |grep loki
45fd786b258e   grafana/loki:2.9.1       "/usr/bin/loki -conf…"   About an hour ago   Up About an hour   0.0.0.0:3100->3100/tcp   loki
启动完毕后,访问端口为 3100 。
Promtail
此处按需修改配置文件和启动命令的日志路径,上文中配置的 nginx 日志路径是 /data/logs/nginx。
wget https://raw.githubusercontent.com/grafana/loki/v2.9.1/clients/cmd/promtail/promtail-docker-config.yaml -O promtail-config.yaml

# 修改配置内容的job
# vim promtail-config.yaml
server:
  http_listen_port: 9080
  grpc_listen_port: 0

positions:
  filename: /tmp/positions.yaml

clients:
  - url: http://loki:3100/loki/api/v1/push

scrape_configs:
- job_name: nginx
  static_configs:
  - targets:
      - localhost
    labels:
      job: nginxlog
      host: centos-ops
      agent: promtail
      __path__: /data/logs/nginx/*log


# 修改启动命令日志路径
docker run --name promtail -d -v $(pwd):/mnt/config -v /data/logs/nginx:/data/logs/nginx --link loki grafana/promtail:2.9.1 -config.file=/mnt/config/promtail-config.yaml
Grafana 绘制 Nginx 请求面板
面板报错 too many outstanding requests 解决:community.grafana.com/t/…
添加 loki 数据源

导入和绘制面板
参考链接:grafana.com/grafana/dash…
导入后,需要按进行如下修改:
- 修改 host 变量 的 query 日志路径

-
修改面板类型,由
Wordmap Panel 修改为Geomap,Wordmap Panel已经停止维护并且后续版本不再支持。关于
Geomap的具体配置,参考链接:grafana 世界地图 官方文档。
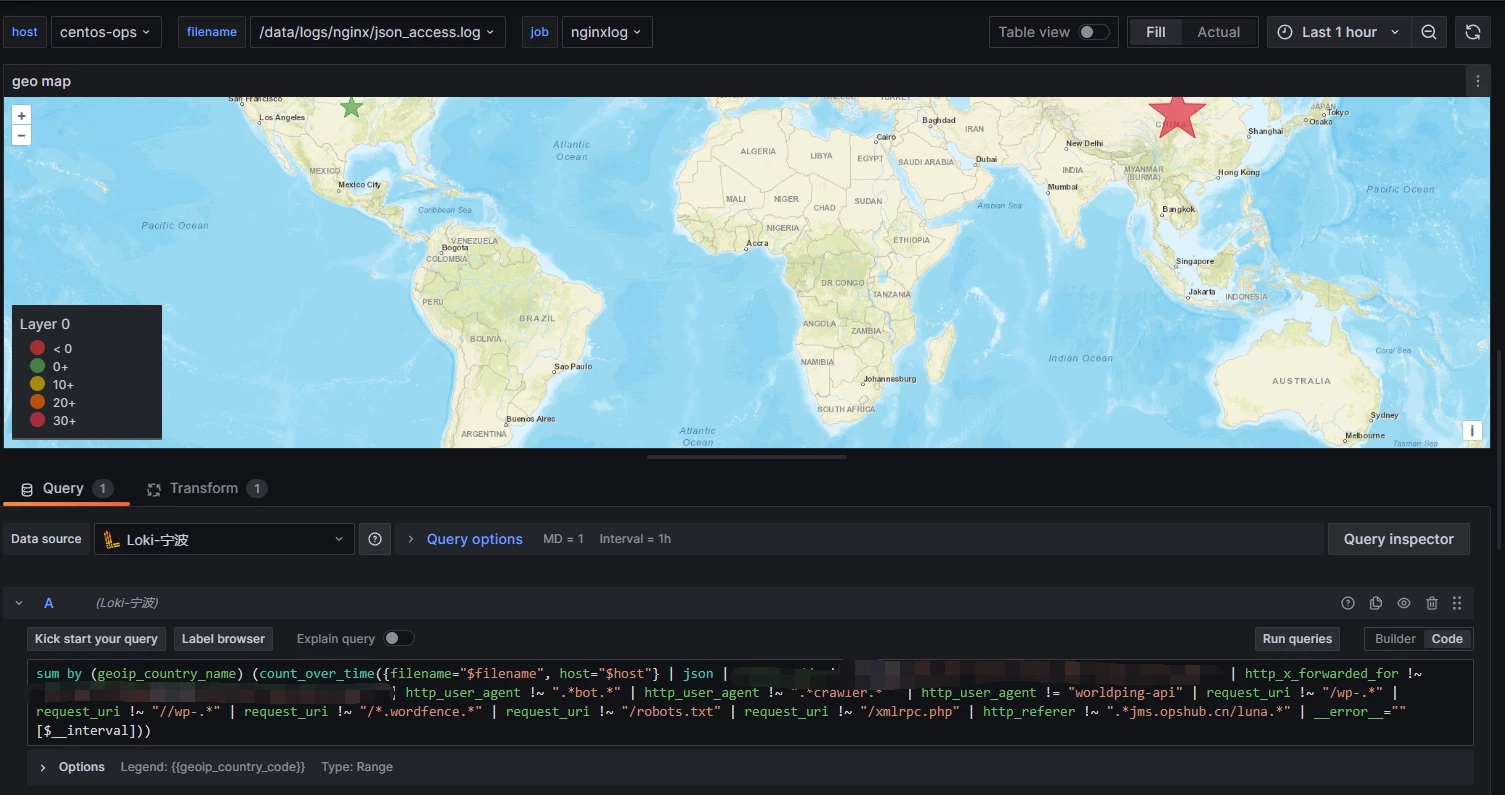
- 修改 promql 和排版,面板作者的 query 中添加了许多自定义的过滤项。按需修改。
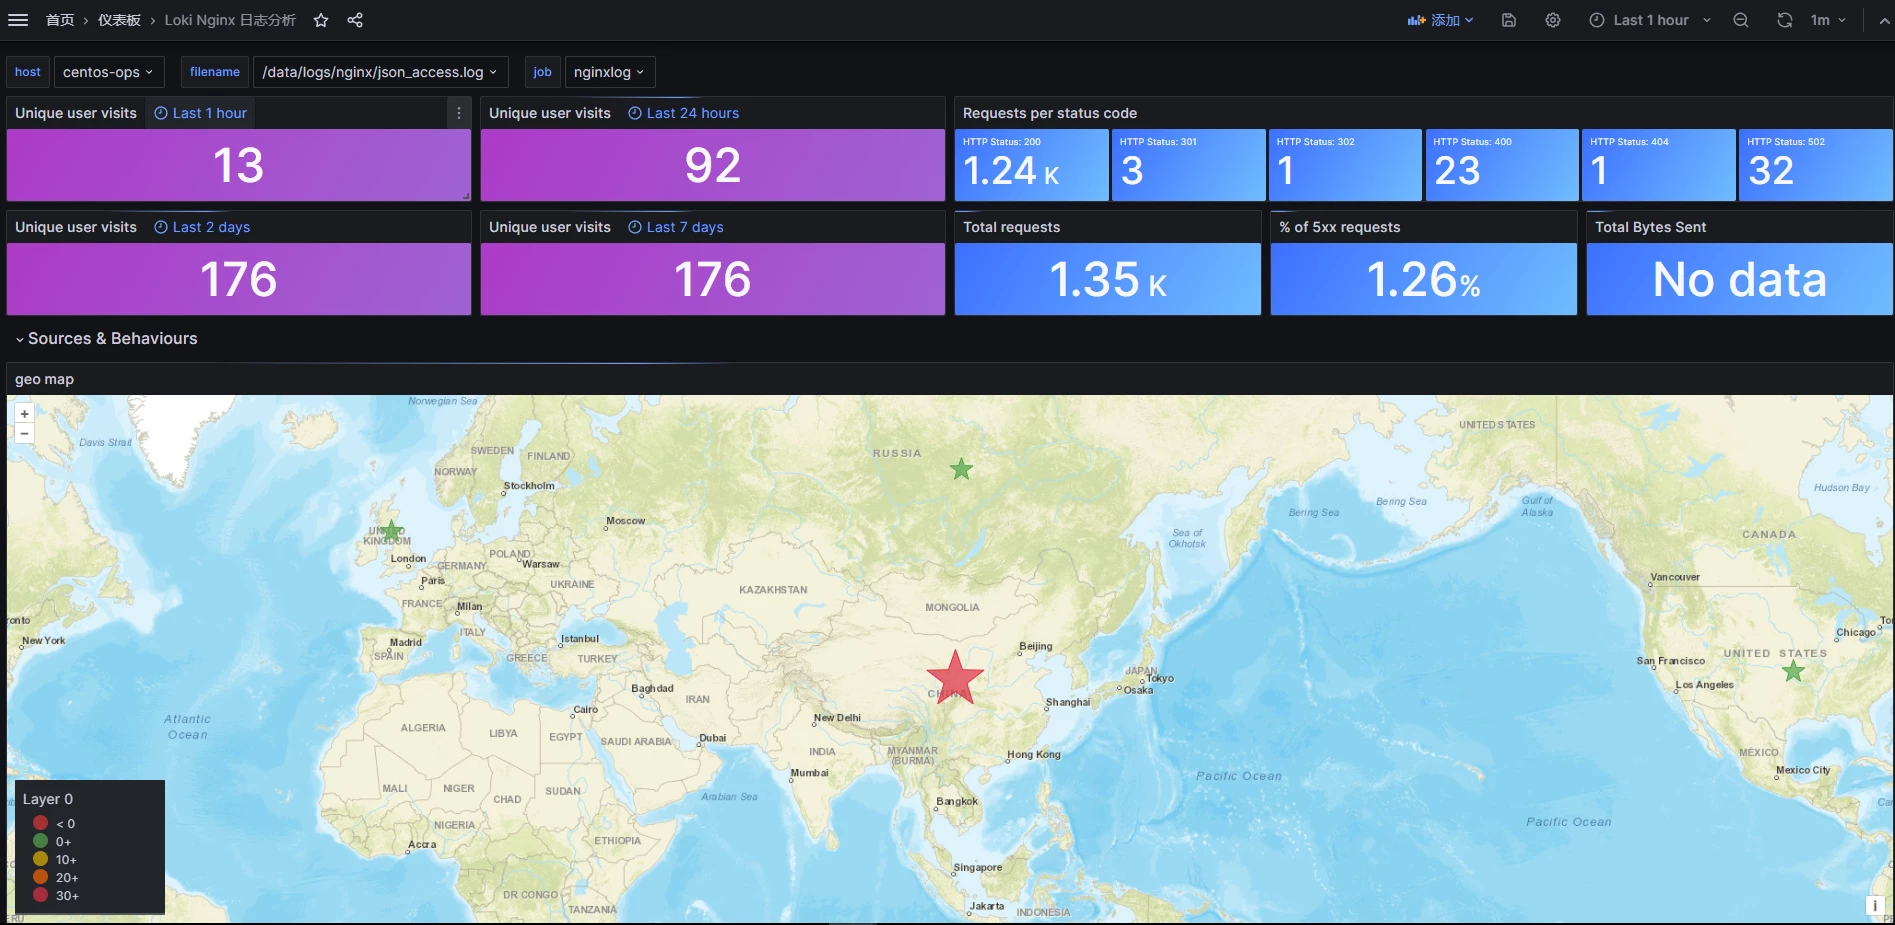
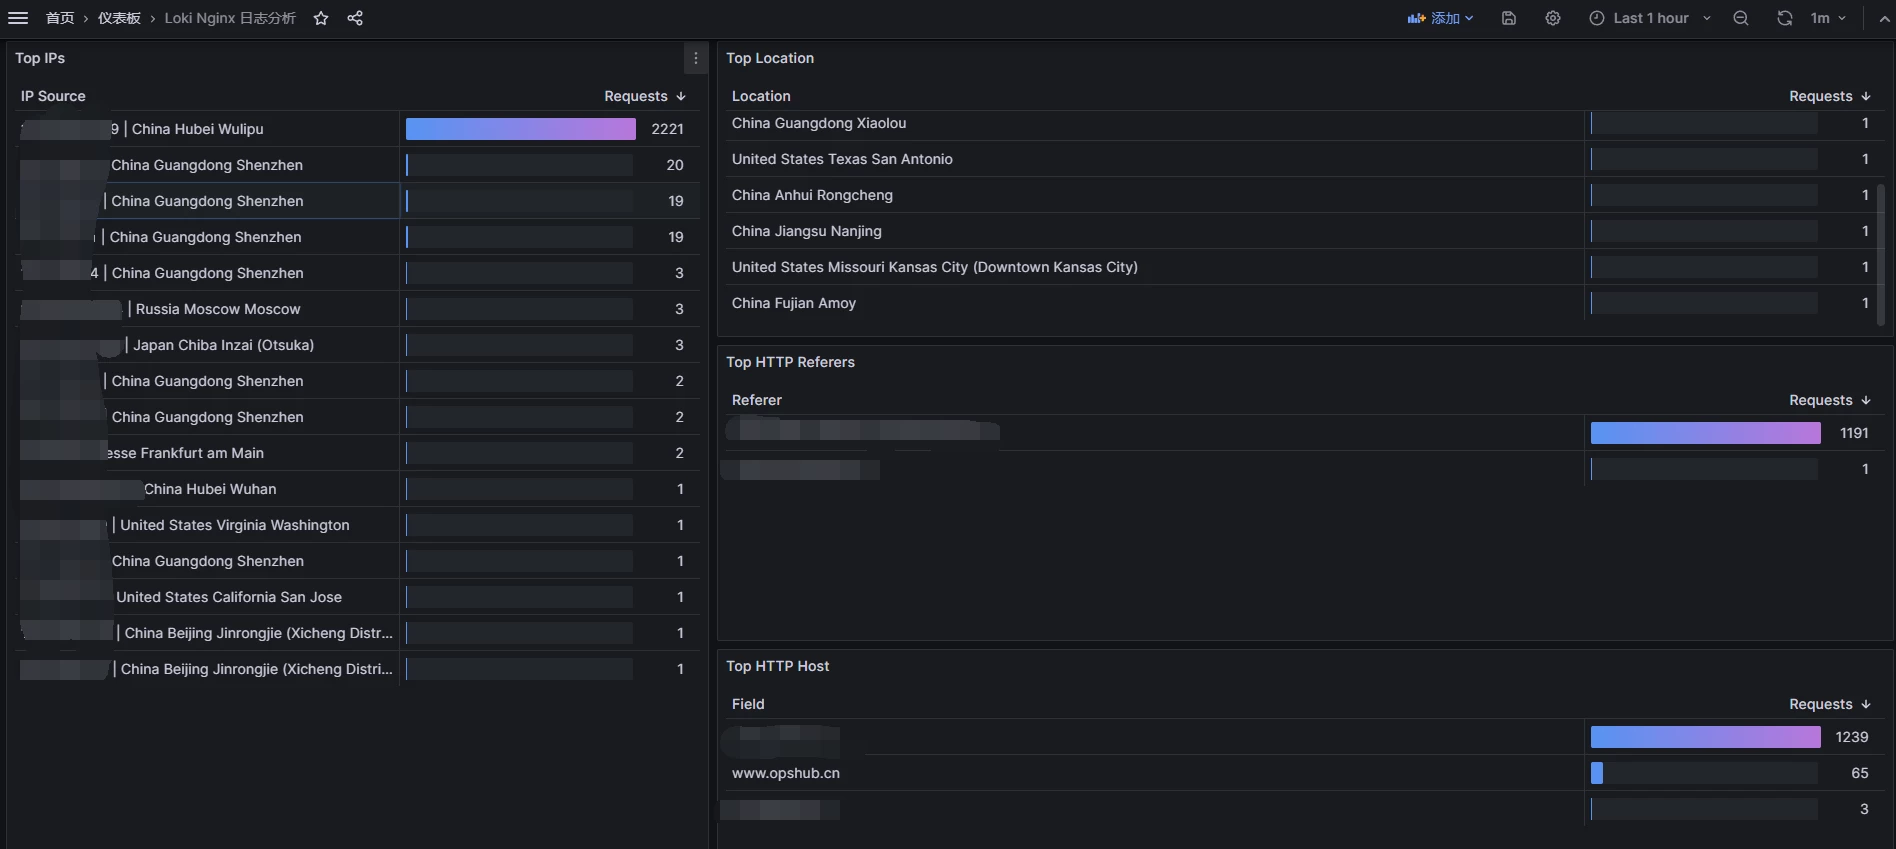
最终效果如下:

Grafana 查询 Loki 日志
参考链接:Grafana Loki 标签
上文中的 nginx 面板,仅用于作为 监控大盘 展示。事实上我们期望 loki 在 grafana 上能够像 kibana 一样,实现各种实时的自定义查询用于检索日志。
在此之前,需要先介绍 Loki 对于日志存储的一些底层逻辑,才会便于理解查询语句该怎么写。
关键字:流,块,标签,元数据,索引
如果对 prometheus 熟悉,应该很容易理解 metric(指标) 和 lable(标签)。
这是一行示例的 prometheus 监控指标:
# promql
node_cpu_seconds_total{host_ip="10.76.9.76"}

# 结果
{__name__="node_cpu_seconds_total", cpu="0", host_ip="10.76.9.76",  job="node_exporter", mode="system", public_cloud="aws"}
其中,metric 是 node_cpu_seconds_total,lable是 查询结果中的键值对。
对于 loki,grafana 复用了 prometheus 的数据结构,但又作出了一些小改动,取消了 metric,转而用流。
这是一行示例的 nginx 日志,日志路径位于 /data/logs/nginx/access.log:
11.11.11.11 - frank [25/Jan/2000:14:00:01 -0500] "GET /1986.js HTTP/1.1" 200 932 "-" "Mozilla/5.0 (Windows; U; Windows NT 5.1; de; rv:1.9.1.7) Gecko/20091221 Firefox/3.5.7 GTB6"
11.11.11.12 - frank [25/Jan/2000:14:00:02 -0500] "POST /1986.js HTTP/1.1" 200 932 "-" "Mozilla/5.0 (Windows; U; Windows NT 5.1; de; rv:1.9.1.7) Gecko/20091221 Firefox/3.5.7 GTB6"
11.11.11.13 - frank [25/Jan/2000:14:00:03 -0500] "GET /1986.js HTTP/1.1" 400 932 "-" "Mozilla/5.0 (Windows; U; Windows NT 5.1; de; rv:1.9.1.7) Gecko/20091221 Firefox/3.5.7 GTB6"
11.11.11.14 - frank [25/Jan/2000:14:00:04 -0500] "POST /1986.js HTTP/1.1" 400 932 "-" "Mozilla/5.0 (Windows; U; Windows NT 5.1; de; rv:1.9.1.7) Gecko/20091221 Firefox/3.5.7 GTB6"
loki 可以收集日志并添加标签,然后将标签作为元数据,标签键值对相同的数据,会被视为同一条日志流。
即不会对日志内容进行索引,而只会对有关日志的元数据进行索引,作为每个日志流的一组标签。标签的键值对任意一个发生改变,都会创建新的日志流。
下面是 一个的 loki 配置文件示例,如何给日志增加静态标签:
scrape_configs:
 - job_name: system
   pipeline_stages:
   static_configs:
   - targets:
      - localhost
     labels:
      job: nginx-access-log
      __path__: /data/logs/nginx/access.log
添加标签后,loki 会将标签作为元数据进行索引,使用标签即可查询到符合条件的日志。
# 查询
{job="nginx-access-log"}

# 日志流
{job="nginx-access-log"} 11.11.11.11 - frank [25/Jan/2000:14:00:01 -0500] "GET /1986.js HTTP/1.1" 200 932 "-" "Mozilla/5.0 (Windows; U; Windows NT 5.1; de; rv:1.9.1.7) Gecko/20091221 Firefox/3.5.7 GTB6"
{job="nginx-access-log"} 11.11.11.12 - frank [25/Jan/2000:14:00:02 -0500] "POST /1986.js HTTP/1.1" 200 932 "-" "Mozilla/5.0 (Windows; U; Windows NT 5.1; de; rv:1.9.1.7) Gecko/20091221 Firefox/3.5.7 GTB6"
{job="nginx-access-log"} 11.11.11.13 - frank [25/Jan/2000:14:00:03 -0500] "GET /1986.js HTTP/1.1" 400 932 "-" "Mozilla/5.0 (Windows; U; Windows NT 5.1; de; rv:1.9.1.7) Gecko/20091221 Firefox/3.5.7 GTB6"
{job="nginx-access-log"} 11.11.11.14 - frank [25/Jan/2000:14:00:04 -0500] "POST /1986.js HTTP/1.1" 400 932 "-" "Mozilla/5.0 (Windows; U; Windows NT 5.1; de; rv:1.9.1.7) Gecko/20091221 Firefox/3.5.7 GTB6"
事实上,也可以使用动态标签,这是一个配置文件示例:
- job_name: system
   pipeline_stages:
      - regex:
        expression: "^(?P<ip>\\S+) (?P<identd>\\S+) (?P<user>\\S+) \\[(?P<timestamp>[\\w:/]+\\s[+\\-]\\d{4})\\] \"(?P<action>\\S+)\\s?(?P<path>\\S+)?\\s?(?P<protocol>\\S+)?\" (?P<status_code>\\d{3}|-) (?P<size>\\d+|-)\\s?\"?(?P<referer>[^\"]*)\"?\\s?\"?(?P<useragent>[^\"]*)?\"?$"
    - labels:
        action:
        status_code:
   static_configs:
   - targets:
      - localhost
     labels:
      job: nginx-access-log
      env: dev
      __path__: /data/logs/nginx/access.log
在这个范例中,使用了正则表达式添加了 action 和 status_code 的动态标签,使用 job,env 添加了静态标签。
现在可以这样查询:
# 查询
{action="GET" ,status_code="200" ,job="nginx-access-log"}

# 符合要求的日志流
{action="GET" ,status_code="200" ,job="nginx-access-log"} {job="nginx-access-log"} 11.11.11.11 - frank [25/Jan/2000:14:00:01 -0500] "GET /1986.js HTTP/1.1" 200 932 "-" "Mozilla/5.0 (Windows; U; Windows NT 5.1; de; rv:1.9.1.7) Gecko/20091221 Firefox/3.5.7 GTB6"

# 所有日志流
{job="apache",env="dev",action="GET",status_code="200"} 11.11.11.11 - frank [25/Jan/2000:14:00:01 -0500] "GET /1986.js HTTP/1.1" 200 932 "-" "Mozilla/5.0 (Windows; U; Windows NT 5.1; de; rv:1.9.1.7) Gecko/20091221 Firefox/3.5.7 GTB6"
{job="apache",env="dev",action="POST",status_code="200"} 11.11.11.12 - frank [25/Jan/2000:14:00:02 -0500] "POST /1986.js HTTP/1.1" 200 932 "-" "Mozilla/5.0 (Windows; U; Windows NT 5.1; de; rv:1.9.1.7) Gecko/20091221 Firefox/3.5.7 GTB6"
{job="apache",env="dev",action="GET",status_code="400"} 11.11.11.13 - frank [25/Jan/2000:14:00:03 -0500] "GET /1986.js HTTP/1.1" 400 932 "-" "Mozilla/5.0 (Windows; U; Windows NT 5.1; de; rv:1.9.1.7) Gecko/20091221 Firefox/3.5.7 GTB6"
{job="apache",env="dev",action="POST",status_code="400"} 11.11.11.14 - frank [25/Jan/2000:14:00:04 -0500] "POST /1986.js HTTP/1.1" 400 932 "-" "Mozilla/5.0 (Windows; U; Windows NT 5.1; de; rv:1.9.1.7) Gecko/20091221 Firefox/3.5.7 GTB6"
因为动态标签在这个例子中,生成了不同的键值对,所以这四个日志行将成为四个单独的流并开始填充四个单独的块。
快速计算一下,如果可能有四个常见操作(GET、PUT、POST、DELETE),并且可能有四个常见状态代码(可能超过四个!),则这将是 16 个流和 16 个流单独的块。现在,如果我们使用 ip 标签,则将其乘以每个用户。会快速创建数千或数万个流。
这是典型的高基数问题,会带来性能的快速下降。所以请避免滥用动态标签,需要谨慎考量动态标签可能存在的值的数量,不宜太多,否则会创建巨量的流。
标签的最佳实践
尽量使用静态标签
host,application,environment是典型的良好标签,它们将针对给定的系统/应用程序进行修复并具有有限值。使用静态标签可以更轻松地从逻辑意义上查询日志(例如,显示给定应用程序和特定环境的所有日志,或显示特定主机上所有应用程序的所有日志)。
谨慎使用动态标签
太多的标签值组合会导致太多的流和块。Loki 对此的惩罚是存储中的大索引和小块,这实际上会显著降低性能。
从以往的日志系统的来看,大家已经习惯了对日志字段全部索引,但是在 Loki 的 实践中,并不需要这么做。只需要在必须时刻增加必要的动态标签。
例如以下两种查询方式,性能不会有显著差异:
# 使用索引
{app="loki",level="debug"}

# 使用过滤
{app="loki"} | level="debug"
过滤是对日志的全文模糊搜索,如果有需要频繁查询指定的字段,可以考虑在客户端产生日志时就进行结构化。例如上文中,我存储 nginx 日志时特意使用了 json 格式来进行存储。
但是这样又会给客户端本身带来额外的存储开销。当然,在使用了 Loki 或其他日志方案例如 elasticsearch 后,日志会被有序的存入到其他地方存储,客户端本身并不需要保留太长时间的日志。
在上文中,我们提到在非必要时不要添加动态标签,那么你什么时候需要动态标签?
稍后有一个关于 chunk_target_size 的部分。如果你将其设置为 1MB(这是合理的),系统会尝试在 1MB 的压缩大小处切割数据块,这大约相当于 5MB 左右的未压缩日志(根据压缩情况,可能高达 10MB)。如果日志有足够的增长速率,能在 max_chunk_age 时间内写入 5MB,或者在该时间范围内写入许多数据块,你可能需要考虑使用动态标签将其分割成单独的流。
标签值必须始终有界
如果动态设置标签,切勿使用可以具有无界或无限值的标签。这会导致创建巨量的流和块。
尝试将值限制在尽可能小的集合内。可以考虑动态标签的个位数或 10 个值。
这对于静态标签来说不太重要。例如,如果您的环境中有 1000 台主机,那么主机标签包含 1000 个值就可以了。
查询语法
参考链接:Grafana Loki 查询
上文介绍的都是基础知识,用于指导如何理解和配置标签。下面简单介绍 Loki 的查询语法 LogQL。
LogQL 和 PromQL 很相似,查询有两种类型:
- 日志查询:返回日志行的内容。
- 指标查询:基于查询结果日志查询以计算值。
二元运算符和函数基本可以直接参考 PromQL,不过多赘述。
以现在的我收集的 nginx json 日志作为范例:
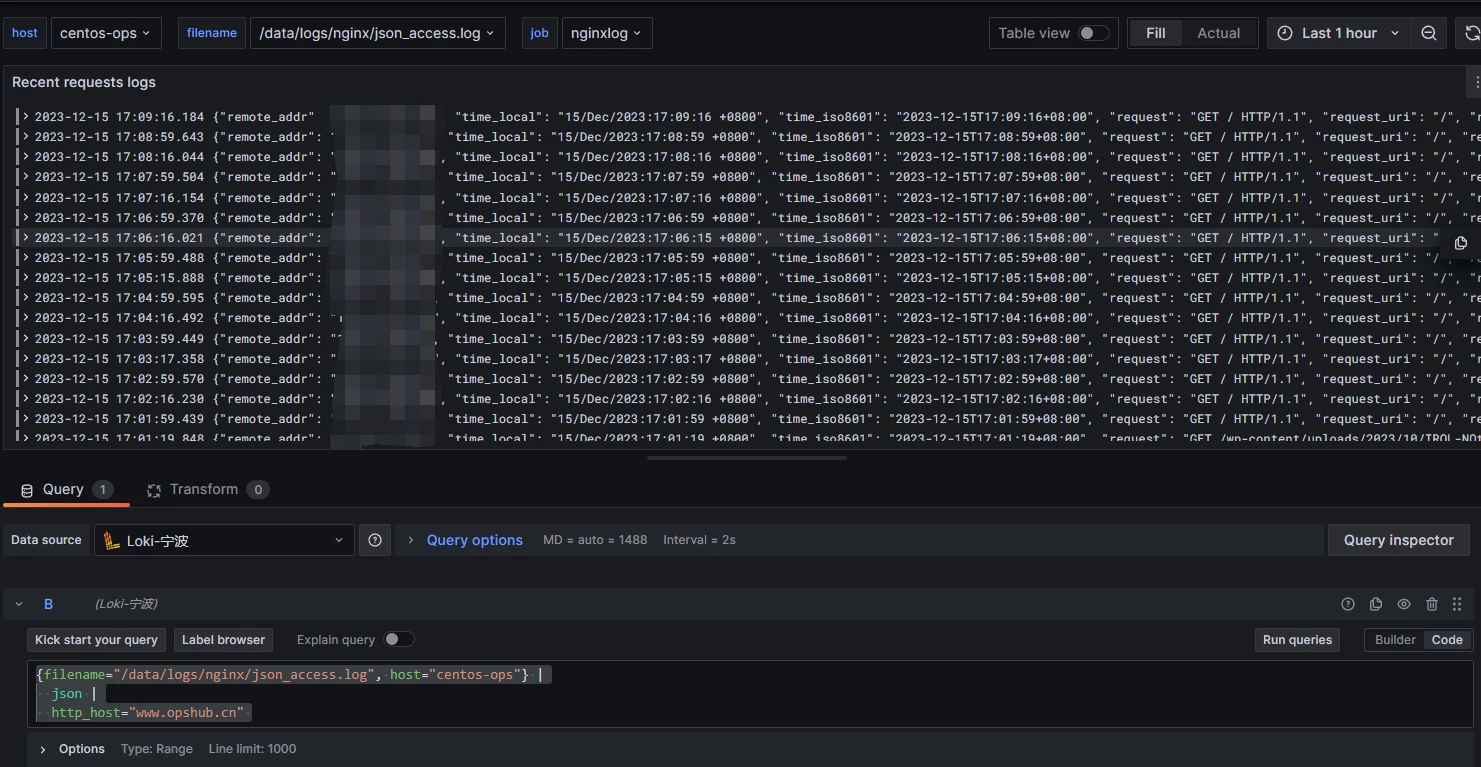
示例一:查询指定时间段内访问 www.opshub.cn 的日志
{filename="/data/logs/nginx/json_access.log", host="centos-ops"} |
  json |
  http_host="www.opshub.cn"
示例二:查询指定时间段内访问 www.opshub.cn 的日志,并进行格式化输出
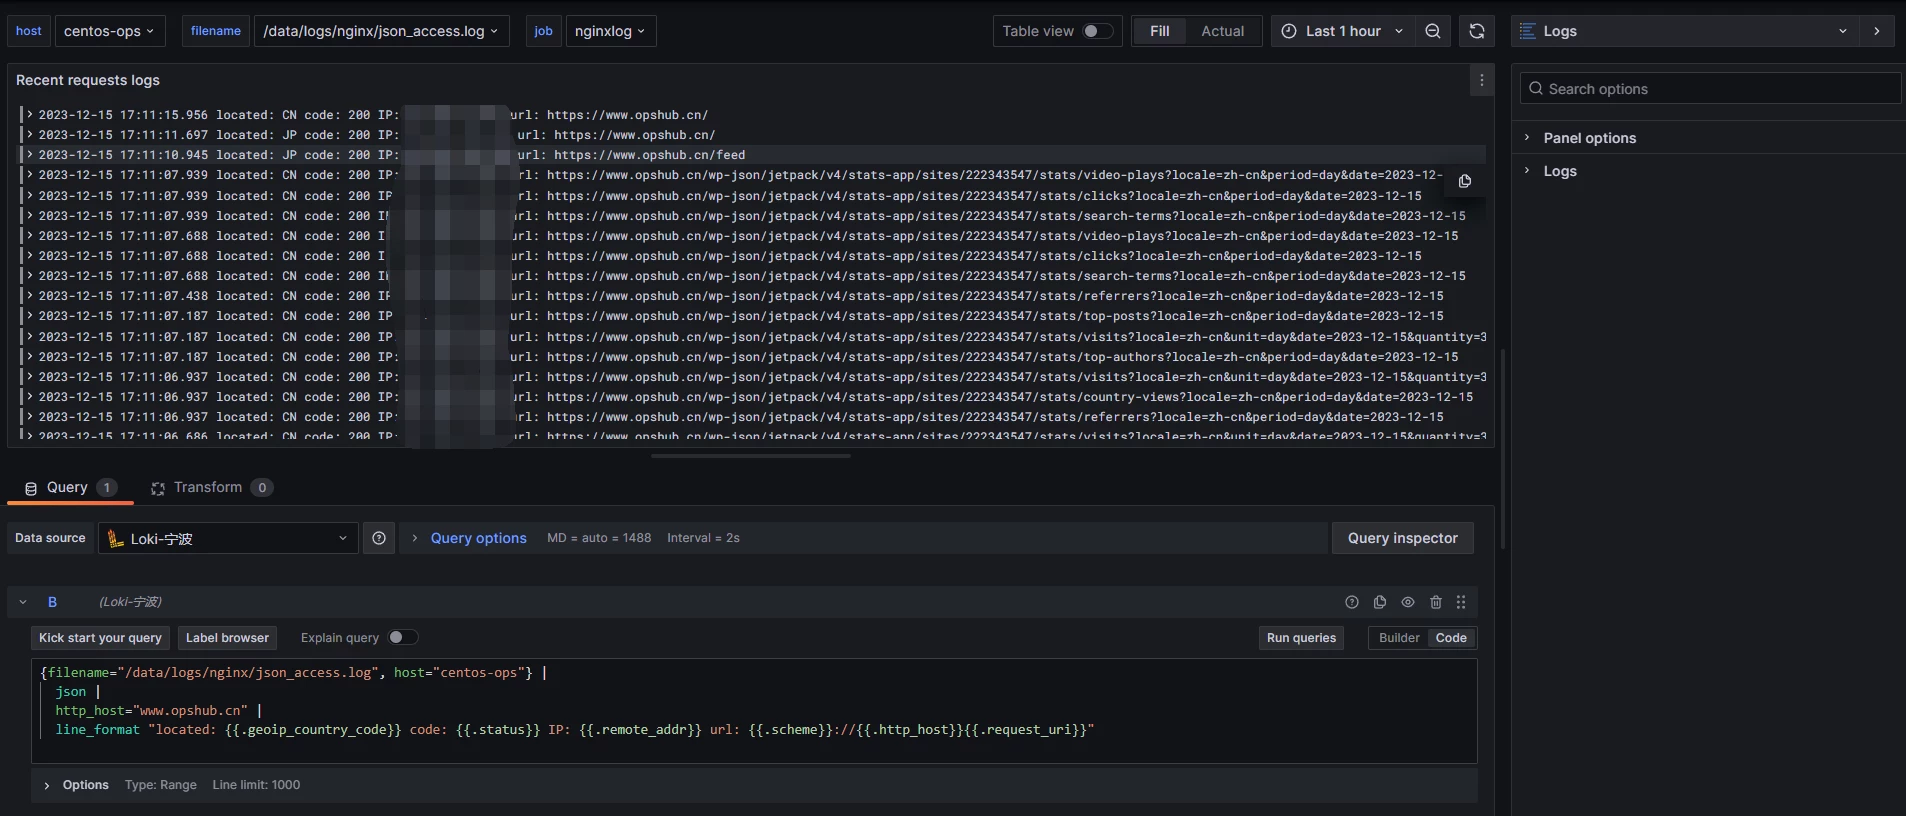
{filename="/data/logs/nginx/json_access.log", host="centos-ops"} |
  json |
  http_host="www.opshub.cn" |
  line_format "located: {{.geoip_country_code}} code: {{.status}} IP: {{.remote_addr}} url: {{.scheme}}://{{.http_host}}{{.request_uri}}"
结果:
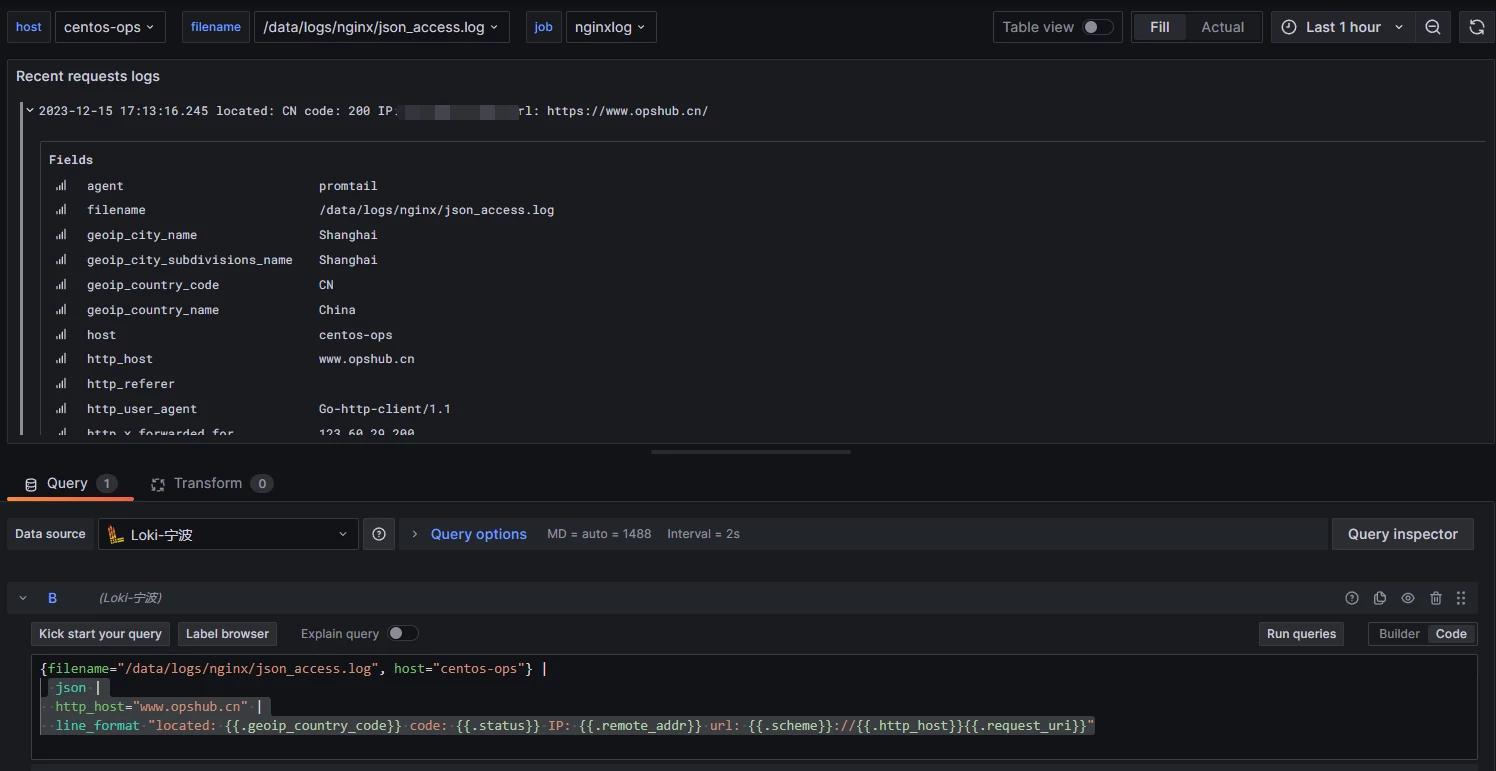
上述两个示例中,如果点开具体的日志查看,可以发现每条日志都全字段索引了。这得益于在客户端(nginx) 存储日志时,已经使用 json 进行了结构化存储。
此时在 Loki 中并不会创建额外的流,因为索引仍是基于静态标签生成的。这种方式最利于以最低成本查询日志的指定字段。
参考链接:Grafana Logcli
使用 logcli 对 job 进行 调试分析,看看当日志为 json 结构化存储时流和标签的情况:
# logcli series --analyze-labels '{job="nginxlog"}'
2023/12/18 10:04:53 http://localhost:3100/loki/api/v1/series?end=1702865093092568225&match=%7Bjob%3D%22nginxlog%22%7D&start=1702861493092568225
Total Streams:  1
Unique Labels:  4

Label Name  Unique Values  Found In Streams
job         1              1
host        1              1
filename    1              1
agent       1              1
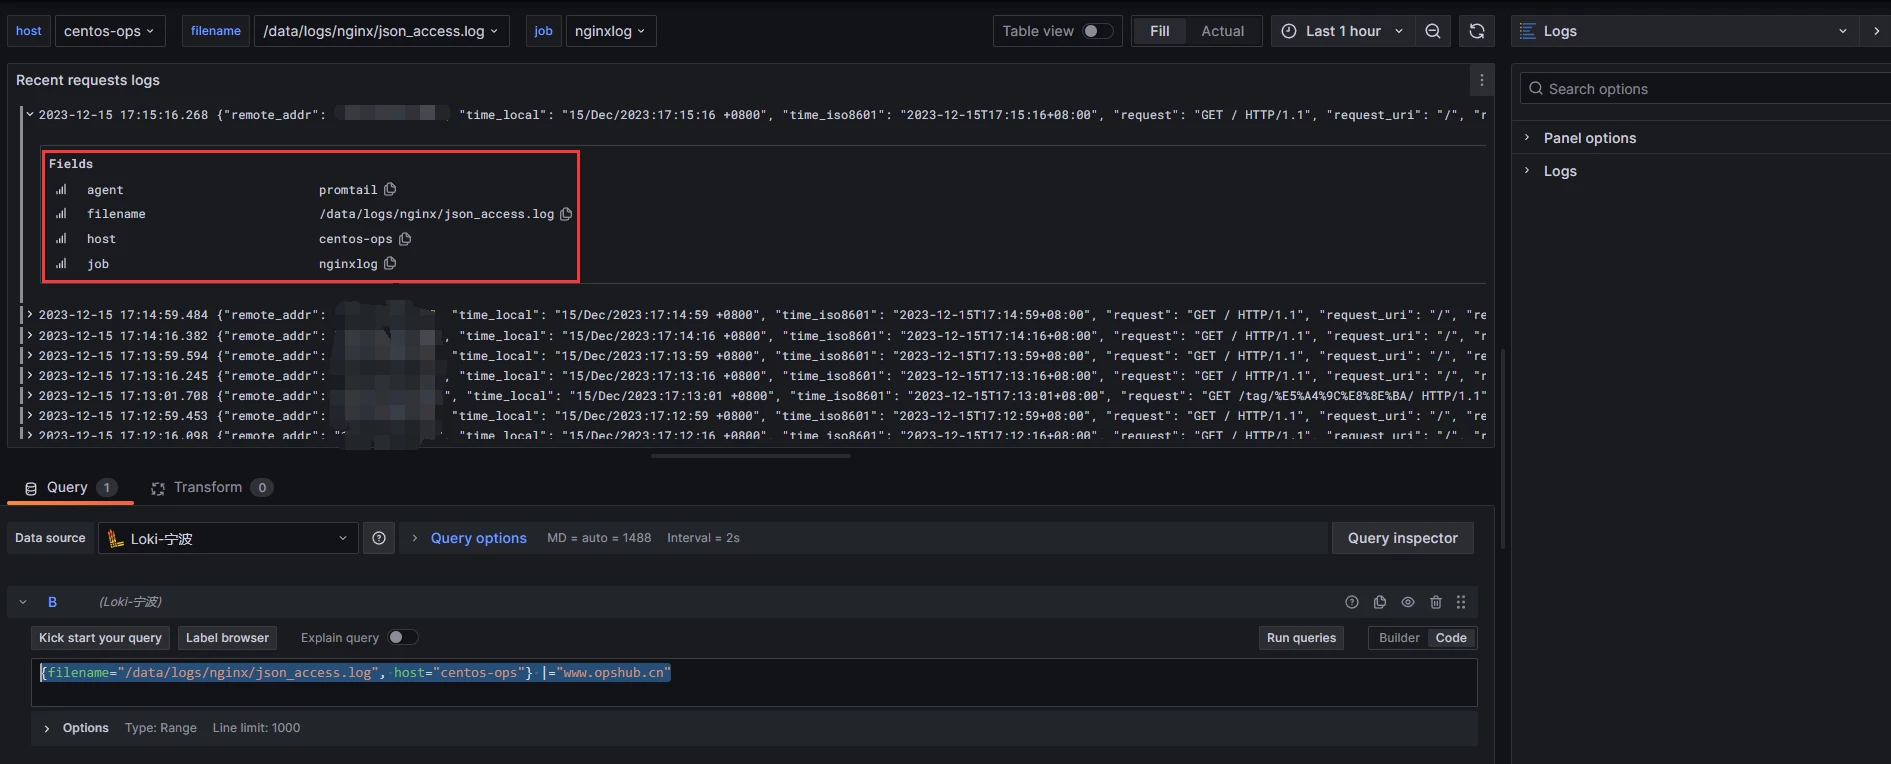
事实上落地在 loki 存储内的索引,只有 4个 指定的静态标签,但是 grafana 执行查询时,可以全字段索引。
并且由于未使用动态标签,在 job:nginxlog 下 4 个静态标签都具有相同的键值对,只会创建一个流。
去掉 LogQL 的 json函数,再次查询,会发现索引只有配置文件中指定的标签:
# 查询语句
{filename="/data/logs/nginx/json_access.log", host="centos-ops"} |="www.opshub.cn"
示例三:查询1小时内内访问 www.opshub.cn 的日志条数,这对应的是指标查询方式。上面两个示例是日志查询方式。
将面板 panel 由 Logs 改为其他类型。
# 查询语句
sum by(host) (count_over_time({filename="$filename", host="$host"}| json |http_host = "www.opshub.cn" |__error__="" [1h]))
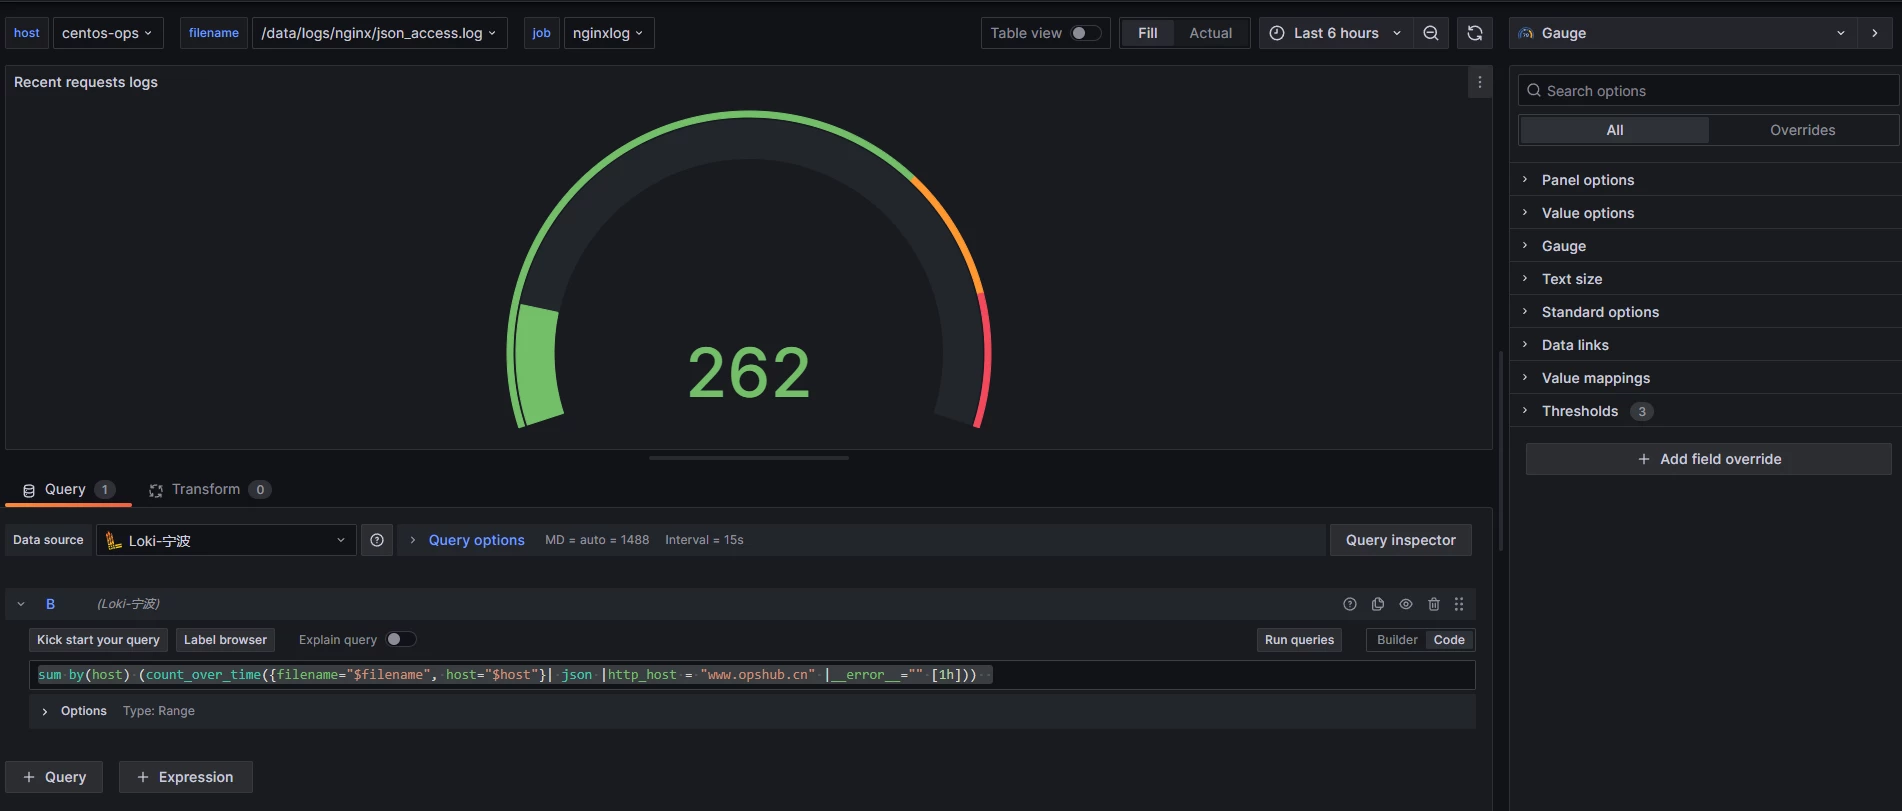
需要说明,访问一个网站链接时,往往会产生不止一条日志,这是因为 Nginx 默认会记录每个请求的访问日志,包括请求的URL、客户端IP地址、响应状态码等信息。如果网页有大量的资源(例如图片、CSS、JavaScript等),每个资源请求都会生成一条访问日志,导致日志量增加。
示例四:查询1小时内内访问 www.opshub.cn 的日志占总日志的比例:
# 查询语句
sum by(host) (count_over_time({filename="$filename", host="$host"}| json |http_host = "www.opshub.cn" |__error__="" [1h]))  /
sum by(host) (count_over_time({filename="$filename", host="$host"}[1h]))
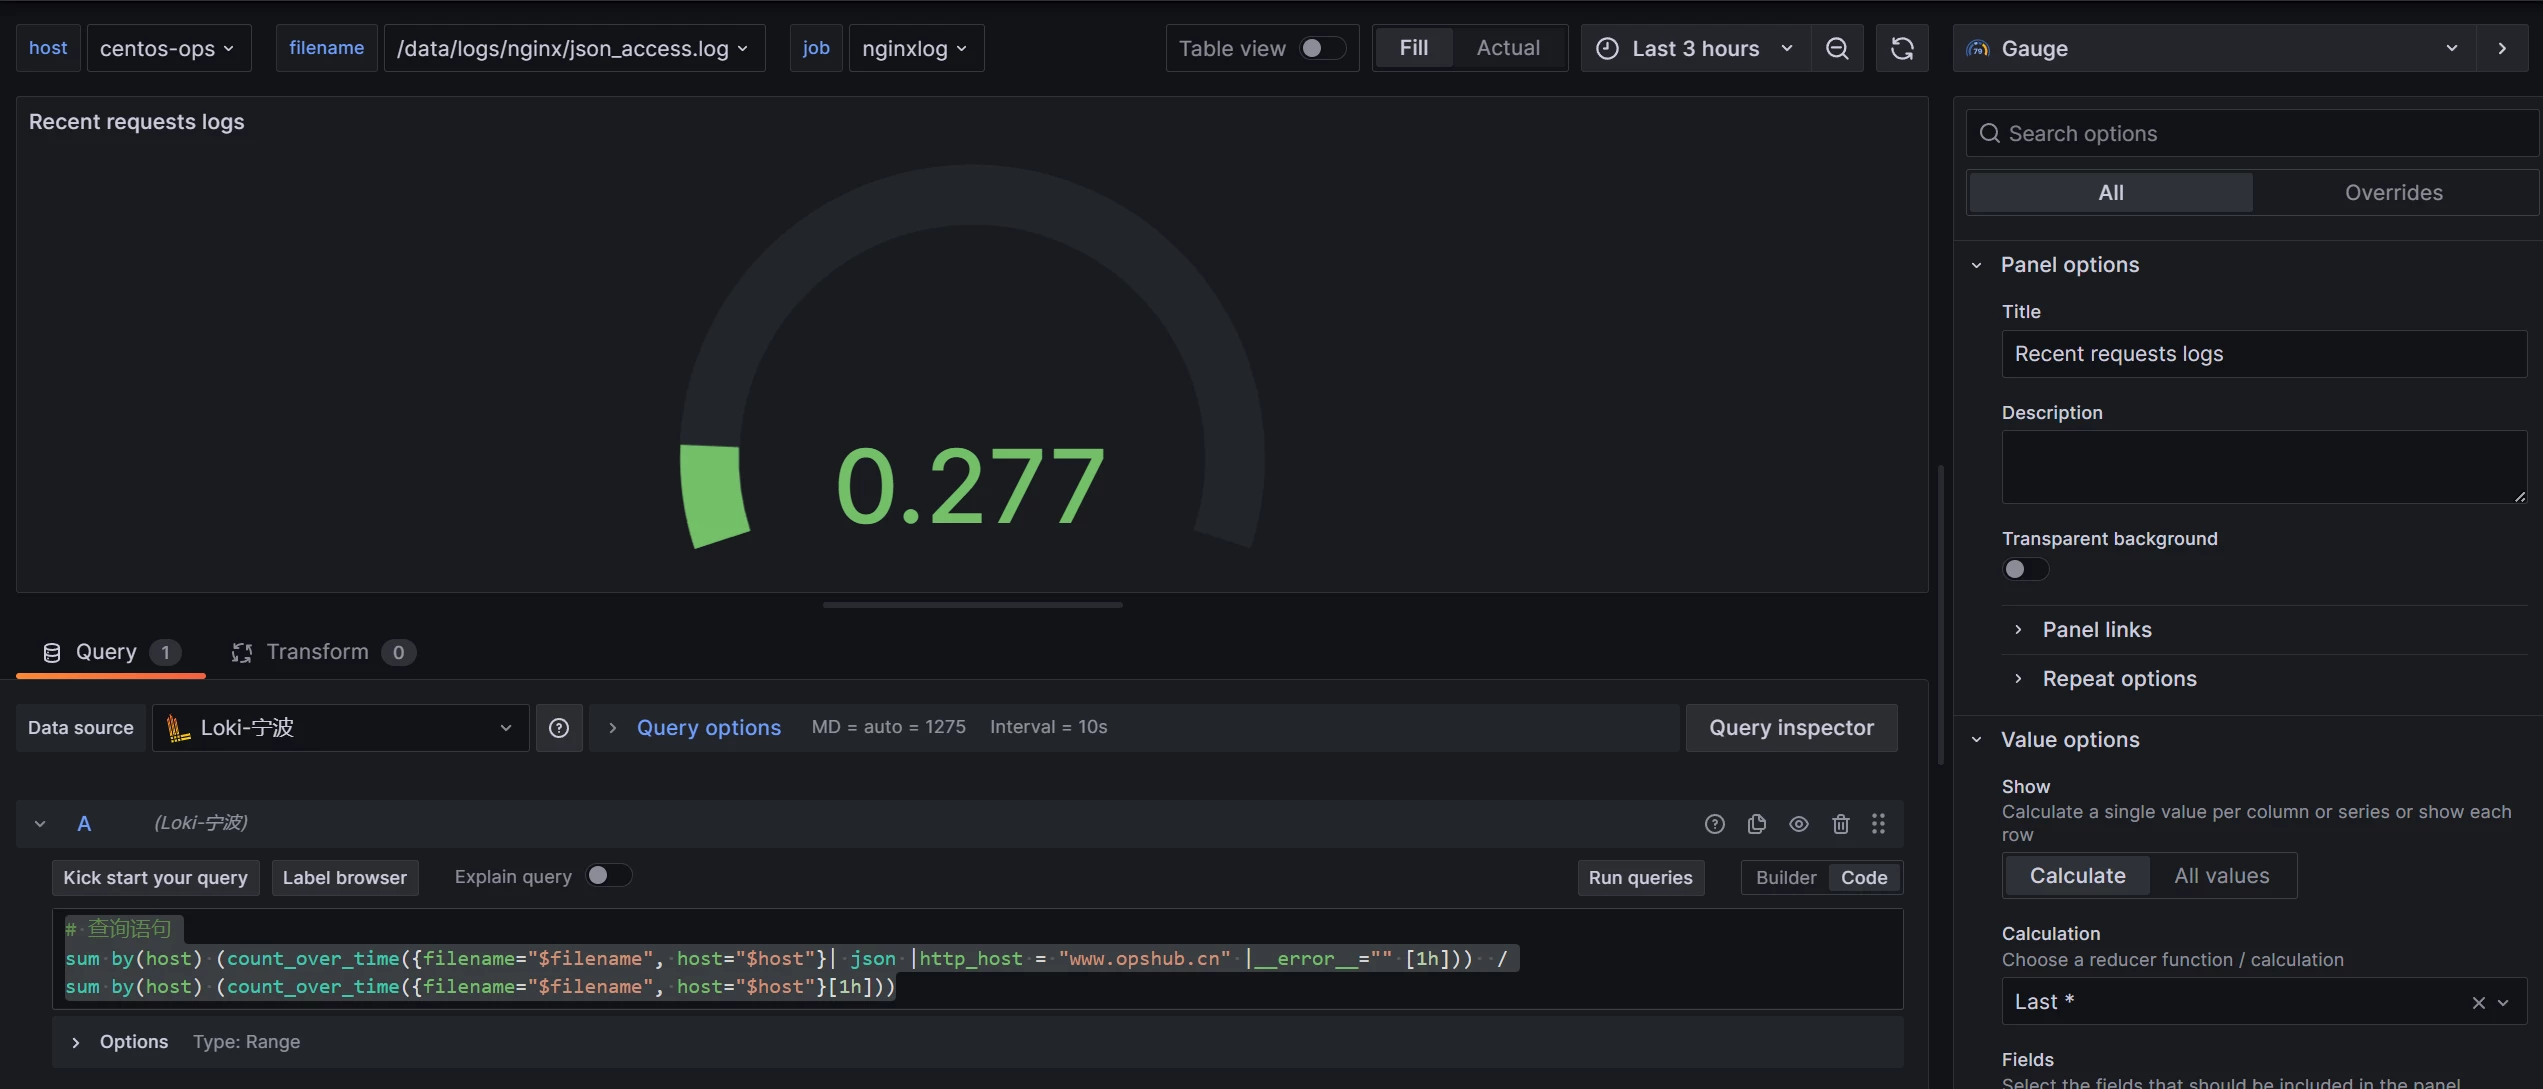
总结
由于 Loki 不进行全文索引,在当前日志量只有几百MB的情况下,内存占用几乎可以忽略不计,Loki + Promtail 总共占用约100MB 内存。而 elk 单单部署了 elasticsearch,已经消耗了 8GB 内存。
对于目前分析个人站点日志数据,单点的Loki 已经足够使用。但是生产环境的最佳实践,例如 k8s 集群部署,多查询器并发查询,存储落地,标签优化,流和块的性能分析等,日后有机会再进一步探索。
本文属于专题:Nginx
- Nginx 准确获取真实IP
- Nginx 获取真实IP进行访问控制
- Nginx 日志分析之 Loki

